As a redux of a plan I had in May, I'm now back on track with building a 3D printer. Spurred on by the release of MakerBot's awesome Replicator 2, it was either saving up and waiting until later next year, or hacking my own together now. Being impatient, the latter seemed appropriate.
Part of my logic is that I can quickly solve problems and technical issues with projects I have outstanding, by virtue of custom-making the parts I need and hopefully producing a better finish all round.
It also means I can quietly add to my stack of projects, but claim they're just sample print pieces when they fail or languish.
I also joined DEMU, a great resource for information (and detailed technical data) on diesel and electric traction, with a great deal of information on the on-track plant equipment I find myself drawn to (probably being bright yellow and a definite appearance of function over form).
I'd already heard of DEMU, but seeing them at the Warley show on Saturday and some amazing samples of printed parts (a pair of incredibly-massively-amazingly EMU detailed bogies) was just the shove I needed to join. I plan to make good use of their drawings for accurate modelling and printing of vehicles I've been trying to find desperately.
I've started sourcing parts for the printer, so it's probably time to start writing up the build in more detail. Even at this stage, there seems to be a whole range of technical issues to contend with before I even get hands on with building it.
I'm not sure how a 3D printer will solve my problems, but I just know it will...
To quote the Underpants Gnomes;
1. Underpants
2. ?
3. Profit
Tuesday, 4 December 2012
Monday, 29 October 2012
UX - More Than Fluff
My day-to-day work tends to get split three ways between information science, information technology and control technology. But the one underlying thing that's common to all and massively neglected across all, is good User Experience or "UX" design.
Too often developers excuse horrific processes and user experiences to "getting things done," or commonly the lack of a user interface design is excused with a weak contrast of consumer and industrial - after all, you only design an interface for flashy consumer gimmicky software and instead you should dump your industrial and business interfaces on users from a-high (akin to a pigeon shitting on your shoulder).
Most of our control work is fixed within the SCADA and networking of plant systems, so more often than not, we're involved with designing interfaces that control large motors, pneumatic actuators and quite often high pressure steam. And yet the portfolio of products designed for this industry isn't frankly good enough to automate a kettle. As a result, we've had to work outside the box and draw from our years of experience building enterprise-grade systems (both hardware and software), to distill what's expected at the high end of IT and deliver it to the field (quite literally).
And yet it's a struggle to convince people that a rainbow colour screen with randomly placed information, weird animations that are linked to unrelated attributes and all running on a crapped out consumer Windoze PC is not the high of industrial automation.
It does frustrate me that more time and effort is put into the graphics and displays seen on films, then are ever put into the real-life counterparts. For what it's worth, we're trying to change this and introduce a level of user experience that matches the serious nature and importance of the systems involved.
For now, I'll leave you with these first class UX/UI designers:
Rant over.
Sunday, 28 October 2012
Winter, the Project Motivator
Now that winter is slowly and cruelly creeping upon us, my lackadaisical project efforts have started to give way to a bit of focus. Over the next few weeks, there should hopefully be some big progress (and write-ups) on my projects, that include:
- RC Platform (aka UAV/Rover)
- RC Hovercraft Rebuild
- RC Boat Rebuild (set back slightly due to new hull damage)
- 28mm Model Building/Painting
- 4mm Plastic & Card Models (1/76th aka OO)
- Train Control System (LCB)
- Train Control Panel (DCC/Traction)
- 4mm Layout (1/76th aka OO)
Plus a big sprinkling of vac-forming, CAD work, panel building, Arduino hackery and lots more fun stuff. Oh and I'll also be lusting after 3D printers and CNC laser cutters. And robots.
Stay tuned.
Tuesday, 7 August 2012
RC Dual-Motor Control
The mission; to develop an Arduino based PWM mixer that can control dual-motor powered vehicles.
Having bought two RC vehicles that rely upon dual-motor control, in the process of stripping out their original low-spec electronics, I was in desperate need for a mixer to take the steering and throttle channel inputs and mix them into left and right motor outputs.
Having searched for a solution, the closest I could find was a ludicrously expensive RC tank ESC, circa £300. So, with an Arduino to hand and a couple of servos, I started developing a simple mixing routine.
The input signals were PWM, or Pulse Width Modulated - a simple way of transmitting an analogue signal using digital pulses - supplied by the steering and throttle channels of the receiver. The corresponding outputs would also had to be PWM, in order to drive the ESC that the left and right motors are driven by.
The outputs are the easy part with help from the Arduino servo library. Most people have driven a servo from their Arduino, it's a nice simple piece of coding, no circuitry, just plug-in and go. But reading PWM turned out to be a bigger problem to tackle then I initially thought. The big mistake was assuming I could read PWM signals easily with the Arduino.
A couple of solutions are floating round, I think I found some on StackOverflow and others on robotics forums, where people were trying to integrate RC receivers with Arduino as a simple alternative to ZigBee.
I even hoped to use that same approach on other projects myself, so was set on getting it to work. In fact, it all sort of started coming together nicely - the RX is even powered off the Arduino's 5V bus, so it keeps things quite nice and simple.
But the code just keeps getting more complex.
In short, it's possible, but a lot of code is needed, and the Arduino can't do much else. From all accounts from others working on similar code, it struggles to read and write two PWM signals. Bugger. I might come back to it sometime, but it's not a nice reliable design at present.
So back to the drawing board.
The final breakthrough came in the form of a £4 electronic mixer. Better known as a V-Tail Mixer, these are designed for simple fixed wing aircraft, that utilise a pair of servos to operate bother rudder and aileron - the mixer takes the values of both and mixes them proportionally. Bingo. Perhaps this is the RC communities biggest secret. Perhaps I've found a genius alternative use of the mixer. Perhaps everybody does this. Who knows? I found jack shit on my travels, so I've come to the conclusion that I made a ground-breaking discovery.
The mixer is perfect - it takes the input values and passes them through mixed. It doesn't do anything else to the signal, so the resulting output seems to work with everything including uni- and bi-directional ESC. And they're £4. Tiny bit cheaper than an Arduino. And less effort.
Perfect. Let's rewind this. The perfect solution, that would fit virtually every use of dual-motor powered vehicles, whether they be boats, tanks, hovercraft - whatever. It costs £4. And yet, it's being sold and advertised solely for people with a V-Tail whose radio transmitter lacks an onboard V-Tail mixer setting. Great.
But all is not lost... In my struggle to find a solution I found the OpenServo project. Quite genius really. Simply, the project's main hardware development is an I2C based controller board, with virtually the same footprint as the regular PWM controllers found in servos. There's a lot in such a small package - including temperature monitoring, advanced programming, braking and a massive voltage range.
Coupled to the I2C bus on the Arduino, I have high hopes of advanced control for robotics (and anything else I can wedge it into). The I2C bus seems to be more and more popular, with it being used for a wide range of applications these days. So, not really of use in driving speed controllers for this mini-project, but definitely of interest for the future...
Friday, 8 June 2012
Productive Fortnight
Having a 4-day weekend is a definite recipe for hobby productivity...
Over the Jubilee weekend/week I managed to push forward a number of projects, including; the OO scale card modelling, the RC dual-motor controller and a couple of new projects.
One of the new projects is Arduino based and makes use of the output channels to control scale lighting on my forthcoming OO layout. The idea is to simulate a day in scale speed and loop through a list of lighting circuits which have start/stop times - as the time is reached the lighting circuit is either faded up (PWM outputs) or flickered on (in the style of fluorescent street lights). I want to avoid building too many circuits (555 timer etc), as the programmable nature of the system gives me the flexibility to tweak and change the lighting as desired (without having to fix on/off times etc with resistors/capacitors).
The main code function is a loop, so with a scaled pause and incremental counter, I can approximate a 24 hour day in whatever time base I want. I could use a potentiometer to dial-in a scale, or I could fix the scale in code. I'll define a number of lighting types, which will define either an analogue/PWM control or a digital control of the circuit - the PWM will allow for fading and the digital for simulating fluorescent and regular tungsten. I can also go ape-shit on the lighting with backlit billboards, building signage etc and funky lighting effects.
My plan is to also use an interrupt channel in order to reset or tweak the playback (perhaps skip an hour etc), that'll enable the loop to be broken and the interrupt code to be executed before the loop resumes.
No code written, but lots of notes and ideas on scrappy bits of paper. When I get a few minutes I'll start sketching out the code. The main issue is devising a template way of driving the lights - I'm thinking of using LEDs for most things, so each channel will need to power a handful of mini-circuits.
This started off the back of me wanting to simulate welding flicker - something I still want to model and may perhaps execute with this approach (probably a little overkill for an Arduino however). Another project on the list; just what I need!
The card models have come a long way - I've virtually finished the low-relief workshop and moved straight into building the concrete bridge. With that finished (sans a few bits that need to be assembled when I know the exact layout of the bridge) I moved onto two new ones; the inspection pit and the small goods store. I've modified both slightly, as I wanted two inspection pits out of the one kit and the small goods store didn't work too well with the type of card I'm using, so some extra glue joints and cover caps are needed there.
The dual-motor controller is an entirely different matter and deserves it's own post...
On a side-note, I did get to see the Queen.
The dual-motor controller is an entirely different matter and deserves it's own post...
On a side-note, I did get to see the Queen.
Thursday, 24 May 2012
First Vacuum Form
Well then, after a complete strip-down and check over of the new vacuum former, I clamped down, heated up, vacuumed and released.
Rather than waste a tonne of new sheet, I reused the first sheet - trying to figure out the heat settings, the timings and the vacuum capacity. I did get distracted at the end by a delivery and slightly burnt the sheet - though it did form better. The sheet was getting a bit fried anyway, so no loss. Gave it a nice texture!
I've got a lot of research into plastics and to figure out the timings with this former, but it's looking to be great fun already. I forgot how badly things start to smell and the strange plastic tastes you get in the mouth when vac forming... Ahhh, how we do like plastic.
Any suggestions for things I can make? I've got too many ideas, so I'm hoping to narrow them down with some horrific suggestions from others. A T-Rex easter egg mould is currently in lead!
Monday, 21 May 2012
Another Decade...
Well, if I've got to grow older, then I deserve cool stuff to make up for it.
So, roll on my newly acquired C R Clarke 1210 vacuum former. Photos to follow, but for the uninitiated, it's a plastic former that uses a combination of heating elements and a vacuum pump to form plastic over metal/wood/plaster/resin formers.
I've made some modifications already to the vacformer, the most major being the replacement of the rear rubber feet with steel slotted rail (actually DIN rail) to better bare the weight of the former across the rear structure (and offer a great way of mounting it to a workbench).
I've been mentally forming a list of things I plan to make on my newtoy professional work apparatus, including hovercrafts, boats, chocolate moulds, ice trays and much more. Well, so much more that I'm forced to keep a list with me, adding lots at random moments of the day.
I've built plenty of formers in the past and have lots of experience with chipping plastic off of complex formers, spreading wax and other shit (recommended by clueless "experts") over the formers, burning plastic, cracking plastic and occasionally, making something really nice. My most successful former (a fairly complex wooden one, made of multiple laminations of wood) is still in heavy use in an engineering lab some 14-15 years later.
Anyway, I can't wait to start building formers - can't beat a present that keeps on giving...
So, roll on my newly acquired C R Clarke 1210 vacuum former. Photos to follow, but for the uninitiated, it's a plastic former that uses a combination of heating elements and a vacuum pump to form plastic over metal/wood/plaster/resin formers.
I've made some modifications already to the vacformer, the most major being the replacement of the rear rubber feet with steel slotted rail (actually DIN rail) to better bare the weight of the former across the rear structure (and offer a great way of mounting it to a workbench).
I've been mentally forming a list of things I plan to make on my new
I've built plenty of formers in the past and have lots of experience with chipping plastic off of complex formers, spreading wax and other shit (recommended by clueless "experts") over the formers, burning plastic, cracking plastic and occasionally, making something really nice. My most successful former (a fairly complex wooden one, made of multiple laminations of wood) is still in heavy use in an engineering lab some 14-15 years later.
Anyway, I can't wait to start building formers - can't beat a present that keeps on giving...
Tuesday, 1 May 2012
Print, Cut, Fold, Stick...
...and wipe off the gluey finger prints.
My first foray into the fantastically detailed Scalescenes self-print OO (and N) gauge model kits. The idea is great; artwork in PDF form to build a highly detailed model, but the added advantage of being able to butcher and hack to build whatever you want, as you're in control of the print production.
I've bought a couple of kits, as they fit so close to what I want (still don't know what I'm going to model yet, but I know some of the bits I want in there) before I've even made one of the free ones.
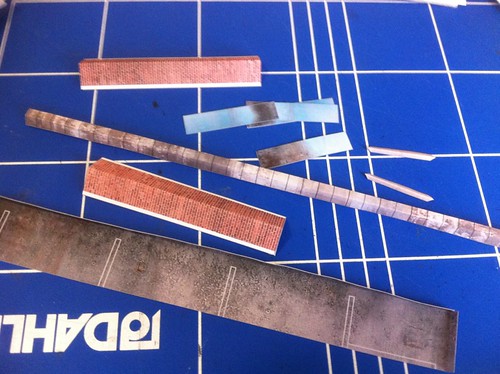
I'm torn. I love the kits, the idea, everything, but my one let down is the cutting and sheet gluing. This isn't fault of the kits, more likely the fault of the crappy blades and steel ruler I'm using. Like the worst kind of hobbyist, I kitted myself out with everything I could ever need - glues, felt tips, stacks of board, matte photo paper, cans of fixative spray and a new safety ruler. On the upside, it did come in pretty cheap, circa £20, excluding the board, so even if this doesn't pan out it's not all going to waste.
Anyhow, back to me whining. I need to find a better cutting method, instead of the "40-stroke, cutting more metal off the ruler than card" technique, whether that be better blades or some amazing secret I've not been told of. Which, nicely comes back to one of the really great things about the kits - they're incredibly forgiving. Having built one of the free downloadable designs (the industrial unit in my case), even in a pseudo-half-arsed way, it looks damn good.
But I suppose that's the point; don't go flying into building the grand design, start simple and get some experience, albeit find out how it's not done, before wasting time, materials and sanity.
The kits are well designed, they build upon a couple of principles; covering, wrapping and masking. Covering involves adhering sheets onto heavy boards and cutting them along the lines, obvious and simple. A lot of crapification occurs here; badly stuck down artwork, frayed edges, wonky cuts - you get the idea. This is a given, unless you've got a die or a big punch cutter, you're not going to get perfect edges, which is why no cut edge is ever exposed.
The next kind of building block, wrapping, also starts with the covering stage, but the artwork is simple grey-line with white fill and results in pieces of board ready to be glued together or stacked, to be wrapped with the actual final artwork. This results in two edges having a seamless finish.
The remaining cut edges get their treatment, along with glued joints between different pieces with simple masking pieces of artwork, not stuck to board, just the weight of the matte photo paper, but with the white edges coloured with a average coloured felt tip. These masking pieces hide a variety of sins, including bad gluing, misaligned joints, really awful cutting and frayed edges.
I've not had a clear run to build a kit, so have had to steal a few minutes here and there to glue a piece, clamp a bit, trim a bit and so forth. At the moment the industrial unit (low relief hence stubby side walls), can stand on it's own, with outer and interior walls. Next step is to build the office and add the sliding door details. Once the main bits are done, it's a case of masking and finishing with the finishing touches, and if it looks half-decent; a bit of extra weathering.
Anyway, check the kits out, they're great. If you've got patience to work with card (and to go through the effort of printing), then I think you'll be rewarded by going down this path. With all of the extra bits of artwork you can also get (matching textures for brick, concrete, tarmac etc), it's easy to hack and modify these kits to fit whatever need you've got. At the very least, try out the free kits...
As and when I finish the first kit, and move onto building the next kits, I'll post more images.
My first foray into the fantastically detailed Scalescenes self-print OO (and N) gauge model kits. The idea is great; artwork in PDF form to build a highly detailed model, but the added advantage of being able to butcher and hack to build whatever you want, as you're in control of the print production.
I've bought a couple of kits, as they fit so close to what I want (still don't know what I'm going to model yet, but I know some of the bits I want in there) before I've even made one of the free ones.
I'm torn. I love the kits, the idea, everything, but my one let down is the cutting and sheet gluing. This isn't fault of the kits, more likely the fault of the crappy blades and steel ruler I'm using. Like the worst kind of hobbyist, I kitted myself out with everything I could ever need - glues, felt tips, stacks of board, matte photo paper, cans of fixative spray and a new safety ruler. On the upside, it did come in pretty cheap, circa £20, excluding the board, so even if this doesn't pan out it's not all going to waste.
Anyhow, back to me whining. I need to find a better cutting method, instead of the "40-stroke, cutting more metal off the ruler than card" technique, whether that be better blades or some amazing secret I've not been told of. Which, nicely comes back to one of the really great things about the kits - they're incredibly forgiving. Having built one of the free downloadable designs (the industrial unit in my case), even in a pseudo-half-arsed way, it looks damn good.
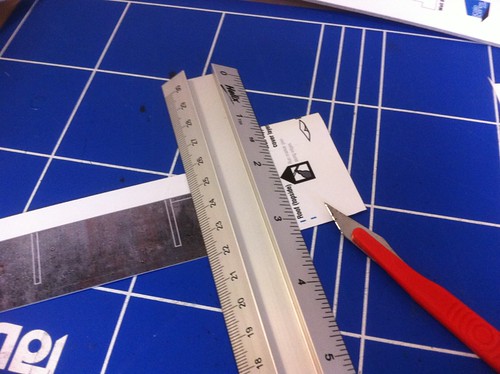 |
| Chop Chop Chop (goes the edge of the metal ruler) |
But I suppose that's the point; don't go flying into building the grand design, start simple and get some experience, albeit find out how it's not done, before wasting time, materials and sanity.
The kits are well designed, they build upon a couple of principles; covering, wrapping and masking. Covering involves adhering sheets onto heavy boards and cutting them along the lines, obvious and simple. A lot of crapification occurs here; badly stuck down artwork, frayed edges, wonky cuts - you get the idea. This is a given, unless you've got a die or a big punch cutter, you're not going to get perfect edges, which is why no cut edge is ever exposed.
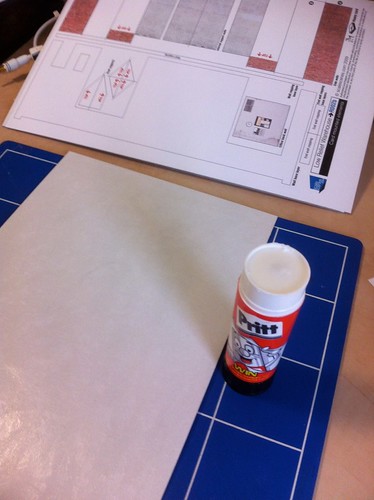 |
| Artwork + Pritt Stick + 2000micron Board = Covered Boards |
The next kind of building block, wrapping, also starts with the covering stage, but the artwork is simple grey-line with white fill and results in pieces of board ready to be glued together or stacked, to be wrapped with the actual final artwork. This results in two edges having a seamless finish.
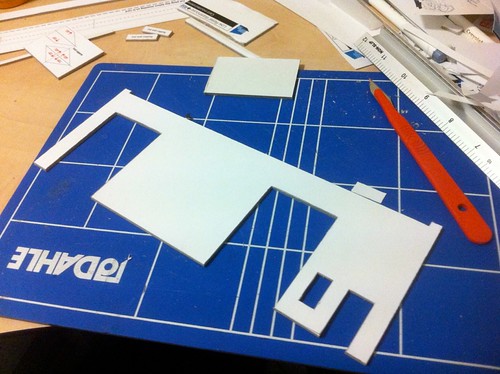 |
| Wrapping Step 1: The base layer with "cutting" artwork |
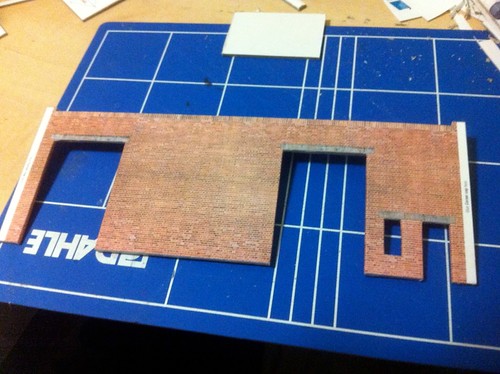 |
| Wrapping Step 2: Wrapping base layer with the artwork |
The remaining cut edges get their treatment, along with glued joints between different pieces with simple masking pieces of artwork, not stuck to board, just the weight of the matte photo paper, but with the white edges coloured with a average coloured felt tip. These masking pieces hide a variety of sins, including bad gluing, misaligned joints, really awful cutting and frayed edges.
 |
| Masking Pieces |
Based loosely on advise, I'm using Pritt-Stick (versus Uhu Stick), I think for the next models I'm going to try using the Uhu Stick, as Pritt-Stick doesn't seem to adhere brilliantly - even with what looks like an even coating applied. A real pisser I found after the first gluing session, was deformation of the board (whether it was already there I don't know) from the adherence of the artwork. I ended up stacking all of the glued boards, and weighting them down with heavy art books. It corrected most of the deformation, but not all. I'm thinking that a bit of hackery with offcuts, glued perpendicular will help to stiffen and keep the bad bits straight (and give the finished model a bit of extra strength).
I've not had a clear run to build a kit, so have had to steal a few minutes here and there to glue a piece, clamp a bit, trim a bit and so forth. At the moment the industrial unit (low relief hence stubby side walls), can stand on it's own, with outer and interior walls. Next step is to build the office and add the sliding door details. Once the main bits are done, it's a case of masking and finishing with the finishing touches, and if it looks half-decent; a bit of extra weathering.
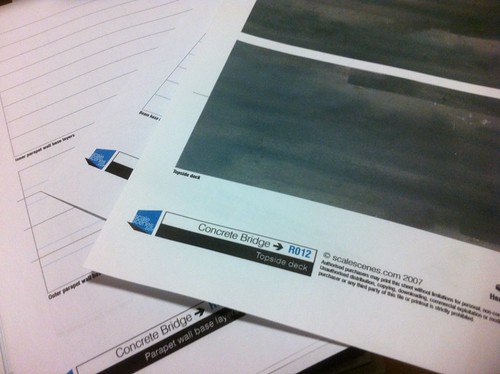 |
| The next kit; the Concrete Bridge (to be heavily adapted) |
Anyway, check the kits out, they're great. If you've got patience to work with card (and to go through the effort of printing), then I think you'll be rewarded by going down this path. With all of the extra bits of artwork you can also get (matching textures for brick, concrete, tarmac etc), it's easy to hack and modify these kits to fit whatever need you've got. At the very least, try out the free kits...
As and when I finish the first kit, and move onto building the next kits, I'll post more images.
Tuesday, 20 March 2012
Jan/Feb Roundup
Well, a new year has come, and we're into March already. I've spent most of my free time procrastinating, making lists and watching action hero films ranging from Iron-Man (1 et 2), Green Hornet, Star Trek (2011 reboot) to X-Men (1-5), Daredevil etc. Pretty much sums up the year to date...
I have however spent time sourcing parts, and coming up with ideas for new projects and modifications to existing. So, a little roundup as to where we are:
I have however spent time sourcing parts, and coming up with ideas for new projects and modifications to existing. So, a little roundup as to where we are:
- RC Platform - I'm still in need of some parts to link the axles with the chassis - I've held back from building the chassis for that reason primarily, and for space the secondarily. At present I don't have any workshop/lab space to work in so it's on the back burner for now. I've sourced lots of pre-manufactured aluminium struts and plates, so this little project might end up parenting a few different RC vehicles.
- RC Boat - as dumb as it sounds, I've had trouble trying to source female-female servo cables, and this has held me back (sourced some from China in December, and still not got them). I also had trouble with my Rx/Tx when trying my test Arduino code; no issues driving servos from the Arduino on a pre-programmed sequence or using a potentiometer, but I'm having trouble getting the Rx to get enough power from the Arduino (some buggering about with cables probably needed).
- RC Hovercraft - as above, plus I still need to find a better way of cutting up plastic tubs to give me the air baffle I need. I can either keep it pretty on the inside, or just make use of copious dollops of industrial adhesive and scrap plastic.
- Train Control Panel - this thing keeps growing and shrinking - there'll probably be a few iterations to get what I want, but that's part of the fun (I think). I'm even considering using two panels and a touchscreen in the centre to fully represent the prototype - more on that later.
- Train Control System - I began building my DCC system in January and February, losing time over the last 3 weeks with travel and what-not. I'm building a CAN-Bus based DCC and IO system using MERG kits and schematics, and a bit of glue in the form of JMRI and/or RocRail. I need to write up a post for the whole system and take some pictures before I finish it, something to do later I think, but in short the IO and DCC control will be coupled to a central controller via CAN-Bus, pretty much in the same way as conventional distributed IO.
Doesn't seem a complete list, but it's all I can think of at the moment. Expect this post to be edited heavily to make it look like I'm top of things.
Subscribe to:
Posts (Atom)