Well then, after a complete strip-down and check over of the new vacuum former, I clamped down, heated up, vacuumed and released.
Rather than waste a tonne of new sheet, I reused the first sheet - trying to figure out the heat settings, the timings and the vacuum capacity. I did get distracted at the end by a delivery and slightly burnt the sheet - though it did form better. The sheet was getting a bit fried anyway, so no loss. Gave it a nice texture!
I've got a lot of research into plastics and to figure out the timings with this former, but it's looking to be great fun already. I forgot how badly things start to smell and the strange plastic tastes you get in the mouth when vac forming... Ahhh, how we do like plastic.
Any suggestions for things I can make? I've got too many ideas, so I'm hoping to narrow them down with some horrific suggestions from others. A T-Rex easter egg mould is currently in lead!
Thursday, 24 May 2012
Monday, 21 May 2012
Another Decade...
Well, if I've got to grow older, then I deserve cool stuff to make up for it.
So, roll on my newly acquired C R Clarke 1210 vacuum former. Photos to follow, but for the uninitiated, it's a plastic former that uses a combination of heating elements and a vacuum pump to form plastic over metal/wood/plaster/resin formers.
I've made some modifications already to the vacformer, the most major being the replacement of the rear rubber feet with steel slotted rail (actually DIN rail) to better bare the weight of the former across the rear structure (and offer a great way of mounting it to a workbench).
I've been mentally forming a list of things I plan to make on my newtoy professional work apparatus, including hovercrafts, boats, chocolate moulds, ice trays and much more. Well, so much more that I'm forced to keep a list with me, adding lots at random moments of the day.
I've built plenty of formers in the past and have lots of experience with chipping plastic off of complex formers, spreading wax and other shit (recommended by clueless "experts") over the formers, burning plastic, cracking plastic and occasionally, making something really nice. My most successful former (a fairly complex wooden one, made of multiple laminations of wood) is still in heavy use in an engineering lab some 14-15 years later.
Anyway, I can't wait to start building formers - can't beat a present that keeps on giving...
So, roll on my newly acquired C R Clarke 1210 vacuum former. Photos to follow, but for the uninitiated, it's a plastic former that uses a combination of heating elements and a vacuum pump to form plastic over metal/wood/plaster/resin formers.
I've made some modifications already to the vacformer, the most major being the replacement of the rear rubber feet with steel slotted rail (actually DIN rail) to better bare the weight of the former across the rear structure (and offer a great way of mounting it to a workbench).
I've been mentally forming a list of things I plan to make on my new
I've built plenty of formers in the past and have lots of experience with chipping plastic off of complex formers, spreading wax and other shit (recommended by clueless "experts") over the formers, burning plastic, cracking plastic and occasionally, making something really nice. My most successful former (a fairly complex wooden one, made of multiple laminations of wood) is still in heavy use in an engineering lab some 14-15 years later.
Anyway, I can't wait to start building formers - can't beat a present that keeps on giving...
Tuesday, 1 May 2012
Print, Cut, Fold, Stick...
...and wipe off the gluey finger prints.
My first foray into the fantastically detailed Scalescenes self-print OO (and N) gauge model kits. The idea is great; artwork in PDF form to build a highly detailed model, but the added advantage of being able to butcher and hack to build whatever you want, as you're in control of the print production.
I've bought a couple of kits, as they fit so close to what I want (still don't know what I'm going to model yet, but I know some of the bits I want in there) before I've even made one of the free ones.
I'm torn. I love the kits, the idea, everything, but my one let down is the cutting and sheet gluing. This isn't fault of the kits, more likely the fault of the crappy blades and steel ruler I'm using. Like the worst kind of hobbyist, I kitted myself out with everything I could ever need - glues, felt tips, stacks of board, matte photo paper, cans of fixative spray and a new safety ruler. On the upside, it did come in pretty cheap, circa £20, excluding the board, so even if this doesn't pan out it's not all going to waste.
Anyhow, back to me whining. I need to find a better cutting method, instead of the "40-stroke, cutting more metal off the ruler than card" technique, whether that be better blades or some amazing secret I've not been told of. Which, nicely comes back to one of the really great things about the kits - they're incredibly forgiving. Having built one of the free downloadable designs (the industrial unit in my case), even in a pseudo-half-arsed way, it looks damn good.
But I suppose that's the point; don't go flying into building the grand design, start simple and get some experience, albeit find out how it's not done, before wasting time, materials and sanity.
The kits are well designed, they build upon a couple of principles; covering, wrapping and masking. Covering involves adhering sheets onto heavy boards and cutting them along the lines, obvious and simple. A lot of crapification occurs here; badly stuck down artwork, frayed edges, wonky cuts - you get the idea. This is a given, unless you've got a die or a big punch cutter, you're not going to get perfect edges, which is why no cut edge is ever exposed.
The next kind of building block, wrapping, also starts with the covering stage, but the artwork is simple grey-line with white fill and results in pieces of board ready to be glued together or stacked, to be wrapped with the actual final artwork. This results in two edges having a seamless finish.
The remaining cut edges get their treatment, along with glued joints between different pieces with simple masking pieces of artwork, not stuck to board, just the weight of the matte photo paper, but with the white edges coloured with a average coloured felt tip. These masking pieces hide a variety of sins, including bad gluing, misaligned joints, really awful cutting and frayed edges.
I've not had a clear run to build a kit, so have had to steal a few minutes here and there to glue a piece, clamp a bit, trim a bit and so forth. At the moment the industrial unit (low relief hence stubby side walls), can stand on it's own, with outer and interior walls. Next step is to build the office and add the sliding door details. Once the main bits are done, it's a case of masking and finishing with the finishing touches, and if it looks half-decent; a bit of extra weathering.
Anyway, check the kits out, they're great. If you've got patience to work with card (and to go through the effort of printing), then I think you'll be rewarded by going down this path. With all of the extra bits of artwork you can also get (matching textures for brick, concrete, tarmac etc), it's easy to hack and modify these kits to fit whatever need you've got. At the very least, try out the free kits...
As and when I finish the first kit, and move onto building the next kits, I'll post more images.
My first foray into the fantastically detailed Scalescenes self-print OO (and N) gauge model kits. The idea is great; artwork in PDF form to build a highly detailed model, but the added advantage of being able to butcher and hack to build whatever you want, as you're in control of the print production.
I've bought a couple of kits, as they fit so close to what I want (still don't know what I'm going to model yet, but I know some of the bits I want in there) before I've even made one of the free ones.
I'm torn. I love the kits, the idea, everything, but my one let down is the cutting and sheet gluing. This isn't fault of the kits, more likely the fault of the crappy blades and steel ruler I'm using. Like the worst kind of hobbyist, I kitted myself out with everything I could ever need - glues, felt tips, stacks of board, matte photo paper, cans of fixative spray and a new safety ruler. On the upside, it did come in pretty cheap, circa £20, excluding the board, so even if this doesn't pan out it's not all going to waste.
Anyhow, back to me whining. I need to find a better cutting method, instead of the "40-stroke, cutting more metal off the ruler than card" technique, whether that be better blades or some amazing secret I've not been told of. Which, nicely comes back to one of the really great things about the kits - they're incredibly forgiving. Having built one of the free downloadable designs (the industrial unit in my case), even in a pseudo-half-arsed way, it looks damn good.
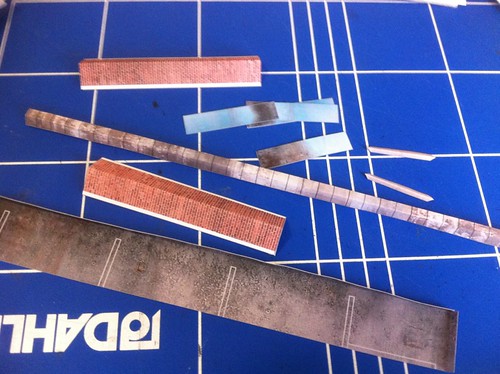
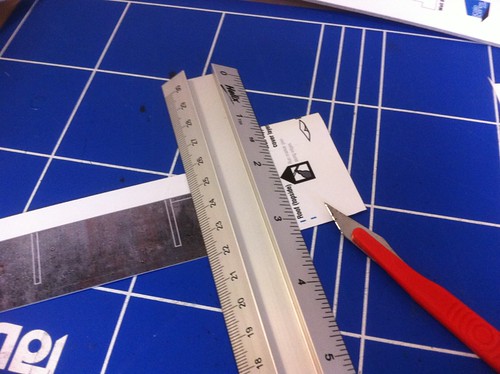 |
| Chop Chop Chop (goes the edge of the metal ruler) |
But I suppose that's the point; don't go flying into building the grand design, start simple and get some experience, albeit find out how it's not done, before wasting time, materials and sanity.
The kits are well designed, they build upon a couple of principles; covering, wrapping and masking. Covering involves adhering sheets onto heavy boards and cutting them along the lines, obvious and simple. A lot of crapification occurs here; badly stuck down artwork, frayed edges, wonky cuts - you get the idea. This is a given, unless you've got a die or a big punch cutter, you're not going to get perfect edges, which is why no cut edge is ever exposed.
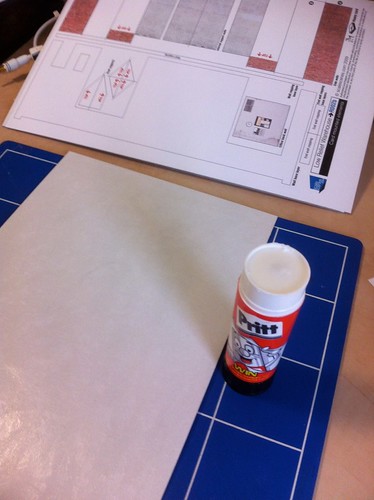 |
| Artwork + Pritt Stick + 2000micron Board = Covered Boards |
The next kind of building block, wrapping, also starts with the covering stage, but the artwork is simple grey-line with white fill and results in pieces of board ready to be glued together or stacked, to be wrapped with the actual final artwork. This results in two edges having a seamless finish.
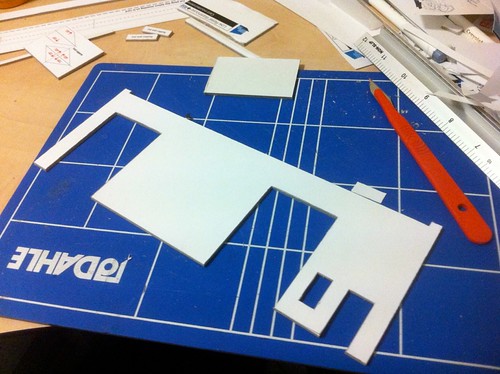 |
| Wrapping Step 1: The base layer with "cutting" artwork |
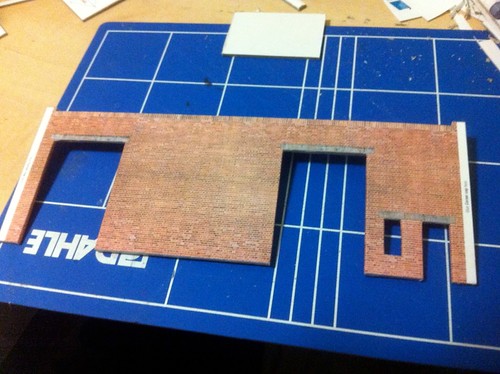 |
| Wrapping Step 2: Wrapping base layer with the artwork |
The remaining cut edges get their treatment, along with glued joints between different pieces with simple masking pieces of artwork, not stuck to board, just the weight of the matte photo paper, but with the white edges coloured with a average coloured felt tip. These masking pieces hide a variety of sins, including bad gluing, misaligned joints, really awful cutting and frayed edges.
 |
| Masking Pieces |
Based loosely on advise, I'm using Pritt-Stick (versus Uhu Stick), I think for the next models I'm going to try using the Uhu Stick, as Pritt-Stick doesn't seem to adhere brilliantly - even with what looks like an even coating applied. A real pisser I found after the first gluing session, was deformation of the board (whether it was already there I don't know) from the adherence of the artwork. I ended up stacking all of the glued boards, and weighting them down with heavy art books. It corrected most of the deformation, but not all. I'm thinking that a bit of hackery with offcuts, glued perpendicular will help to stiffen and keep the bad bits straight (and give the finished model a bit of extra strength).
I've not had a clear run to build a kit, so have had to steal a few minutes here and there to glue a piece, clamp a bit, trim a bit and so forth. At the moment the industrial unit (low relief hence stubby side walls), can stand on it's own, with outer and interior walls. Next step is to build the office and add the sliding door details. Once the main bits are done, it's a case of masking and finishing with the finishing touches, and if it looks half-decent; a bit of extra weathering.
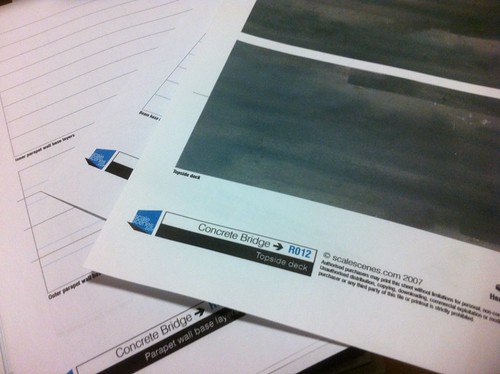 |
| The next kit; the Concrete Bridge (to be heavily adapted) |
Anyway, check the kits out, they're great. If you've got patience to work with card (and to go through the effort of printing), then I think you'll be rewarded by going down this path. With all of the extra bits of artwork you can also get (matching textures for brick, concrete, tarmac etc), it's easy to hack and modify these kits to fit whatever need you've got. At the very least, try out the free kits...
As and when I finish the first kit, and move onto building the next kits, I'll post more images.
Subscribe to:
Posts (Atom)