Tuesday, 20 March 2012

Jan/Feb Roundup

Well, a new year has come, and we're into March already. I've spent most of my free time procrastinating, making lists and watching action hero films ranging from Iron-Man (1 et 2), Green Hornet, Star Trek (2011 reboot) to X-Men (1-5), Daredevil etc. Pretty much sums up the year to date...

I have however spent time sourcing parts, and coming up with ideas for new projects and modifications to existing. So, a little roundup as to where we are:
  • RC Platform - I'm still in need of some parts to link the axles with the chassis - I've held back from building the chassis for that reason primarily, and for space the secondarily. At present I don't have any workshop/lab space to work in so it's on the back burner for now. I've sourced lots of pre-manufactured aluminium struts and plates, so this little project might end up parenting a few different RC vehicles.
  • RC Boat - as dumb as it sounds, I've had trouble trying to source female-female servo cables, and this has held me back (sourced some from China in December, and still not got them). I also had trouble with my Rx/Tx when trying my test Arduino code; no issues driving servos from the Arduino on a pre-programmed sequence or using a potentiometer, but I'm having trouble getting the Rx to get enough power from the Arduino (some buggering about with cables probably needed).
  • RC Hovercraft - as above, plus I still need to find a better way of cutting up plastic tubs to give me the air baffle I need. I can either keep it pretty on the inside, or just make use of copious dollops of industrial adhesive and scrap plastic. 
  • Train Control Panel - this thing keeps growing and shrinking - there'll probably be a few iterations to get what I want, but that's part of the fun (I think). I'm even considering using two panels and a touchscreen in the centre to fully represent the prototype - more on that later.
  • Train Control System - I began building my DCC system in January and February, losing time over the last 3 weeks with travel and what-not. I'm building a CAN-Bus based DCC and IO system using MERG kits and schematics, and a bit of glue in the form of JMRI and/or RocRail. I need to write up a post for the whole system and take some pictures before I finish it, something to do later I think, but in short the IO and DCC control will be coupled to a central controller via CAN-Bus, pretty much in the same way as conventional distributed IO.

Doesn't seem a complete list, but it's all I can think of at the moment. Expect this post to be edited heavily to make it look like I'm top of things.

Saturday, 5 November 2011

Train Cab Control System Part 2

I've written and rewritten this post countless times as I've played around with the design and as parts have arrived. It probably makes little sense, but at least you get an idea as to where things are going...

Main Controls

I've gotten most of the push buttons and physical controls, and have devised numerous solutions for the main quadrant controls now.

The first solution I devised, is to take some Telemec' joysticks, and rip them apart, building a custom aluminium framework to house them, and attaching a suitable mechanism to actuate a potentiometer. The second, is to not bother with quadrant controls...

As I've found, there are virtually no manufactures of them around, and those I've found are ludicrously expensive (or are an import job). In the end, the controls I thought would be the hardest to source (rotary hand wheels/levers) are actually proving to be the more easier.

So, for this first version, the brake will be a hand wheel with knob, and the throttle will be a rotary lever. I'm still awaiting the lever, but have already snagged a couple of the hand wheels. No picture at the moment, but will add one later.


Enclosure

The new enclosure arrived - I'm somewhat limited to space and initially to the kind of enclosure, so for the first panel, I'm tied to the dimensions based upon the largest pre-manufactured enclosure I could find.
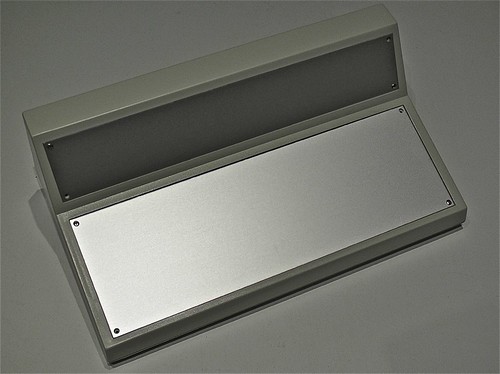
Boss Enclosure
Boss Enclosure
The enclosure consists of two panels - a main aluminium plate, where all of the controls will go, and a top aluminium plate, where the feedback and a couple of additional controls will go. The rear of the enclosure will sport a couple of connectors for power and data.

The enclosure should be deep enough for most of the components - where possible I'll tier/stack the Arduino boards on the back of some of the interface elements, and the others will be placed at the rear/back (the deepest part). Some of the Telemecanique controls are deep, so I'll have to cheat with positioning if I hit problems.

The layout of both panels will be done in CAD; I'll outline each component, and include it's cut-out, allowing me to shuffle around. I'll digitally precision cut a prototype panel out of card in our engineering lab, so I'll have something I can mount the controls to, and sit into the enclosure to check it works, and feels right.

Once I'm satisfied, I'll use an accurate overlay to mark the aluminium and to cut it. I don't have access to a laser or CNC cutter so I'll have to do it carefully with a bench drill - most of it is circular so no big issues. For square cuts, I'll have to ensure that the control has a bezel that will hide any imperfections.

I've got a large stock of anodised aluminium extruded profiles, so I can easily build up and build down for some of the controls - perhaps making some look modular or segregated. Anything I make will bolt together - I'll rivet if needed, and I'll avoid welding the aluminium if at all possible.

Even though the enclosure is a beautiful shade of fresh-vomit-beige, I'll hopefully be spraying it to a bluish-grey that's common for modern train cabs - I'll need to play around with shades to get it right, and I'll avoid two-toning the plastic case. The aluminium probably needs painting as well, again that'll be a nice bluish-grey, though I may make it a dark grey for better contrast with the labels and pilot lamps.

All of the legends and labelling will be printed/precision-cut polyester, with a polycarbonate laminate - it's what's used on control panels, and should look great. Not sure whether to completely cover the aluminium, or just do it around each control. The CAD will help immensely in getting the artwork accurately shaped and cut.


Controls

As mentioned in the previous post, there's going to be a bit of work involved in integrating the panel with a DCC system. It's not going to be quite as easy as focusing on controls first and then programming afterward - I'll need to know how the programming will work, in order to figure how the controls can be implemented (and which are needed or should be avoided).

I would hope/expect at the least to have the following controls:
  • Throttle
  • Brake (with simulated deceleration/proportional braking)
  • Emergency Brake (emergency stop controls, bypassing the deceleration configuration)
  • Direction (forward/off/reverse)
  • Horn A (high tone)
  • Horn B (low tone)
On top of those controls the following could be included:
  • Parking Brake (on/off with pilot indicator)
  • Pantograph (up/down with pilot indicator)
With it being a DCC controller, there's a lot of benefits in having a full compliment of controls that can be mapped to the function keys, and have them labelled in accordance to what they normally are (and coloured/laid out appropriately). Then again, there's finite space, so some will be tactile, and others will have to be soft-controls, and accessed through JMRI or a DCC-orientated keypad (like a PS/2 keypad etc).

Telemecanique Joystick & Keyswitch
Telemec' Joystick & Rotary Key Switch
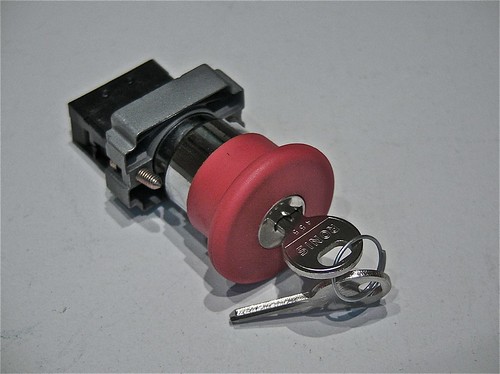
Telemecanique Stop Button
Telemec' Mushroom Key Button
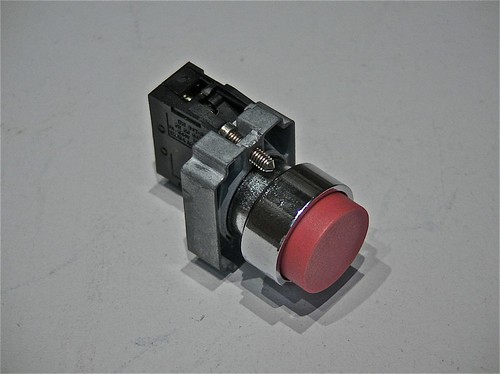
Telemecanique Push Button
Telemec' Push Button

Information Panel & Feedback

Part of the panel is to control a train, and part is to control the DCC functionality (such as consisting, selecting a train etc). Looking at modern train cabs, many feature glass-panel displays for diagnostics, train overviews (i.e. showing the rolling stock, consisting etc) and schedule information. In our case, we have JMRI, which will be offering a big chunk of this information - and in the same way as the real systems will need to have some form of tactile interface (touch screen or keypad), we'll need the same.

I don't want the DCC aspect to be obvious - it's whether I include a tactile interface on the panel, use a touch screen or rely upon an external keypad. Whichever, I need info from JMRI, and I need info for the DCC controller. And I need to control them both.

There's quite a bit of feedback for the panel to display - indicators, LCD's and needle gauges. I'm inclined to avoid needle gauges, and use multi-line LCD displays in their place.

The indicators could include:
  • AWS
  • Alarm
  • Overload/Trip
With displays/guages including:
  • DCC Config
  • Speed
  • JMRI Info
Naturally there are quite a number of input controls and output indicators I could include, but it really comes down to how realistic the panel is to be, and whether it's worth including them for the sake of doing so.
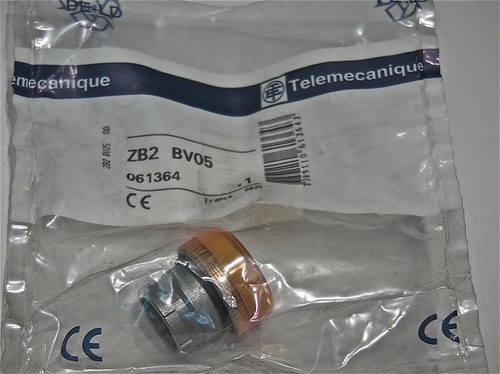
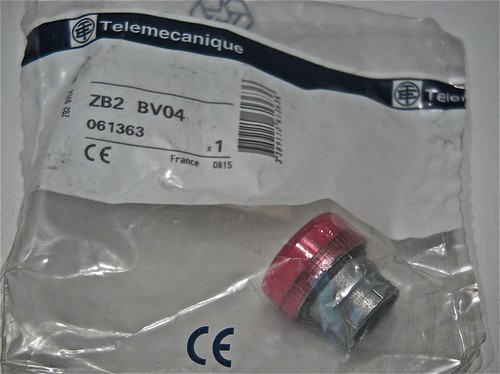
Telemecanique Amber Pilot Lamp
Telemec' Amber Pilot Lamp (sans-bulb holder)
Telemecanique Red Pilot Lamp
Telemec' Red Pilot Lamp (sans-bulb holder)

Programming & Function Mapping

An important part of designing the panel, is ensuring there are enough input controls to cover the most important functions, and mapping them correctly. This requires a bit of deep research, figuring out what standards there are, what I can actually control and how they're controlled. Simply, if a horn is generally a specific Fx number, then I need to know which it is, so I can map it to the correct button, conversely some functionality that should be on the control panel might not be controllable - it might need to be programmed instead or is hardwired, such as lighting etc.

As it seems that I'm headed towards an information display as part of the overall panel, then most of the functionality will be mapped out in a GUI form (mimicking a real-life HMI) - this should also serve as a means to select trains and interact with the LCB as needed.

Bigger decisions are with the underlying electronics and interfacing. I've spent a good few weeks researching the electronics, both prototype and scale, my conclusions of which are far too long for this post, so I'll ramble along on that subject later. I've got quite a few design considerations to make, and to decide on the buses and technologies that I'll build the panel and future layouts upon.

Resources

My first port of call will be MERG, the Model Electronic Railway Group, a membership-based society in the UK that focuses solely on the electronics aspect of model trains - there's some really interesting projects I'll probably cover in the future, including position locations using RFID and servo point control.

A great resource is OpenDCC, a German-based OpenSource project, that consists of hardware and software - including great guidance on implementing and programming DCC. The English translations are a little ropey in places, or missing altogether, but nonetheless this is the best resource I've seen (and seems to have the best technical understanding).

The JMRI project is of course an excellent source of information, though a quick Google search turns up some great blogs and presentations on JMRI.

Another great project that I recently found, Rocrail, offers an attractive alternative to JMRI, and something worth looking at.

Another useful resource is the NMRA, the National Model Rail Association - though US based, is pretty much the norm for most model rail standards, so will be reference for any integration with DCC.

Next Steps...

As you can see, I'm still trying to figure things out, and am planning/designing on the fly. I started writing this post weeks ago, re-writing every time something new came up, or a problem was solved, or a new problem was found. I'm getting closer, I think...

Wednesday, 26 October 2011

Train Cab Control System Part 1

In the effort to occupy more of my spare time, and to create a problem to be solved, I decided that a regular DCC controller for my forthcoming OO layout is just not good enough.

Looking around, I've not found anything good enough or cheap enough to use, nor anything that's actually good-looking or remotely fun to use. So new projects, here we come.

The Idea

The idea is to build a pseudo-realistic control panel, that mimics the pre-requisite controls, and the type of touch and feel found in the cab of a real train. Because I don't have a specific train cab in mind, I'm not replicating a prototype panel in existence, but taking the essence of the feel of the cab and condensing that into something small enough to be used practically at home.

After seeing the InterCity APT a few weeks back, I've been inspired by the simplicity and general layout of it's controls. Coupled with images scouted from Flickr and with Google, theres enough scope to do something that is original, yet quite obvious as to purpose.

The Look & Feel

I started researching and planning an older style panel, but gave up when I made little headway in sourcing real (actual used/new parts) or pseudo-real (stuff that vaguely looks like the real thing) levers and parts. It seemed I'd be forced to make replicas; either approximate in size, or scaled to fit, using vac-form plastic and wooden parts. While relatively straight forward for me, I just don't have the time or space to be doing that at the moment (though I'm really keen to build a mini-vac former so I can do it in the kitchen).

Having stared at the pictures of the APT cab, it dawned on me that not only can I build a modern cab using actual components (allowing me to get away from the "hand-made" look), but I'd have enough wiggle room to build something that could look like a prototype off Bombardier or Siemens' next design.

By using the same kind of switches and selectors as would be used in an actual cab, the panel should have the same feel - even with clunk-click selector switches for direction, and large illuminators for feedback. I'm not planning to use electronics parts (the kind you pick up at Maplin), but the regular day-to-day heavy duty controls that we use in proper control panels.

The Controls & Electronics

The manufacturers of train control systems, for the most part, use these electrical components in their panels - there will however be some difficulty in sourcing the two quadrant levers used for speed and braking, and any needle gauges (yup, seems like they're still being used). My initial thoughts are to utilise LCD displays for speed, braking and "general information" (i.e. the DCC train selected and other programming stuff).

I'm also considering how advanced it should be, as a keypad might be useful - then again, with the palette of functions in DCC, provided I settle on function numbers for each function layout-wide, there'll be actual buttons for those functions - two-way horn buttons, light switches, pantograph controls etc. A ball-mouse or trackpad is probably overkill, but worth considering for JMRI integration.

It'll basically be a panel building job, tied into an Arduino based I/O card, and a couple of extra bits of electronics for the gauges. I'll also finish it with nice rugged connectors for power, data and USB (interfacing the Arduino).

For the most part, I'll used Telemecanique buttons and switches, though the quadrants might be a custom build using Telemec bits and bobs, and some scratch building for the framework. The LCD units will be of course interfaced with the Arduino, but are as close to what would be used, that they'll be fine. I'm not going to use little LEDs etc, but instead use actual pilot lights (big, but the real thing).

I've sourced a large angled console enclosure, that features a display panel - and excellent mimic of the real thing. Using aluminium, I'll build one or two brackets, one to hold a mini LCD display (for JMRI) and one to hold some additional controls I might implement in the future. I'd love a touchscreen, but I think it might knock the panel over using it, so that'll be a separate project (a signal operators panel I think).

It'll be tied together by a paint job to the case (greyish blue/bluish grey) and polycarbonate-coated polyester labels (again what's used in combination with traffolyte for the real thing).

I'll of course go balls-out on the internal cable looms, even though it'll spend most of it's time sealed. Might put thumb-screws on for easy internal access...

DCC Integration

The biggest issue that was always going to present itself, was integration with a DCC system. After spending time chatting with the folks at MERG, it seems that my original thoughts are correct, and that unless I plan to write an entire DCC stack (ermmm, no), then I need something else to do the DCC control.

So this leads onto JMRI and CAN-Bus.

I have two options at this stage, both involve JMRI as the core DCC control stack. The panel can either interface through customer code using USB and acting as an input to JMRI, or it can be part of a CAN-Bus network, and the CAN-Bus controller can interface JMRI. Thanks to the work at MERG, the latter looks to be the easiest.

More to come, plus I'll start posting pictures of parts as they arrive. Lots to think about on the code side, and integration, so again, more to come.

Stay tuned.

Monday, 10 October 2011

Monkey-fun

In a packed weekend, I got to see lots and lots of Barbary Macaques up-close in a forest... Oh and I got to drive two trains.

Oh yes.

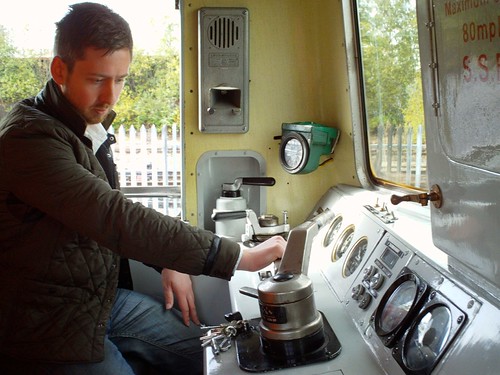
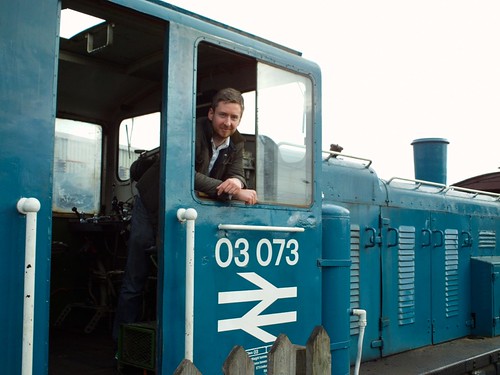
Not only did I get to drive a class 03 diesel shunter (03703), but I got to drive a class 73 electro-diesel locomotive tractor unit (73006) too... Both were in their BR colours; a wonderful combination of BR Blue and yellow (with the body in the distinctive BR greyish-blue and the cabs in the normal yellow).

DSC00038
Class 73 Electro-Diesel (73006)

I'm not sure which I loved the most, driving a 600hp generator on rails (the 73) or the 200hp farm tractor on rails (the 03). Both are so different, but both fantastic to drive; the former is what you'd expect from a train - ammeters, voltage regulators and a wide range of mode selectors, and the latter is a simple combination of air-selected gear changing and a throttle.

DSC00071
Class 03 Diesel (03073)

A short post, but I'm in the middle of getting the Arduino code right for the twin-thruster controls... Oh, and I've got plans for a few of new projects, including an OO (1:76) track inspection carriage (a real one, that'll use image analysis software) and a DCC control panel that mimics a real set of cab controls.

Lots of pictures to follow...

Thursday, 6 October 2011

RIP Steve Jobs

I've never been one to idolise, nor one to have personal heroes, but to me, Steve Jobs has always been a hero and an inspiration since my first foray into Apple Computers, and it's colourful history. I love watching his keynotes (even after knowing what was launched or announced), they motivate and captivate like no other. His attention to detail and passion are present in every product. His vision and his compelling ability to excite and inspire will be sorely missed, but never forgotten.

Monday, 19 September 2011

Hovercrafts & Models

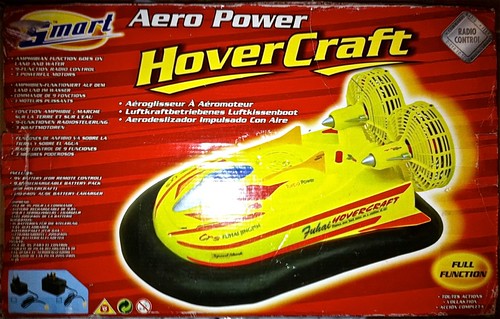
Another car boot, another treasure trove of finds - including an RC hovercraft, sets of Star Wars model kits and a pristine Scalextric set... Awesome!

Like the RC boat, the hovercraft features twin props, that deliver forward/reverse/left/right, with a third channel controlling the inflation fan. I've already tested and promptly stripped down the hovercraft, with the aim to upgrade in a similar fashion as the RC boat, but also to fix some major design flaws.

IMG_3087
RC Hovercraft

The first flaw being the inflation fan's power dropping when the props are driven (the main motors just steal the power from the inflation motor), forcing it to deflate. The second is the gap between the inflation fan and the air intake - there's no ducting, so when the air pressure is high (i.e. when it inflates) the air is blown back along the internal shell of the body and blown out through the air intake.

Both of these flaws are fixable, the first resolved as a result of replacing all of the electronics I planned to do anyway in a mirror of the RC boat (putting in two batteries instead). There'll be one battery powering the inflation and the electronics, and one battery powering the twin props. The latter will use the same electronics design as the RC boat. I plan to use the third channel on the Tx/Rx to offer a latching control for the inflation - enabling the hovercraft to be powered on/off remotely.

The second problem requires a bit of hacking (that'll be made good with a complete body respray), and involves a piece of ducting being formed between the fan and the air intake. It needs to be lightweight and plastic - the bottom of a plastic disposable cup/pot springs to mind; the right shape, can have a hole in the bottom cut to line up with the fan and can be cut to height to fit the gap (which is considerable).

As hinted, I'll respray the entire body shell - I'm thinking in a military grey, accented with red and white safety stripes I'll cut out in vinyl.

I'll post the strip-down with photos in the next post, and I'll mention the Star Wars models in a little more depth later on as well...

Tuesday, 30 August 2011

Arduino RC Boat Speed Controller Part 1

Prompted somewhat by coincidence, we happened upon a small model boat exhibition this bank holiday weekend, in the grounds of Holdenby House alongside it's food festival. I took plenty of pictures of the boats (and birds of prey in their falconry centre), but neglected to take pictures of the food - whoops...

Though I probably don't need to completely upgrade the electronics for the RC Boat I snagged a few months back, I've been getting carried away with designing cool solutions nonetheless. The boat uses two motors for both thrust and turning, with the current electronics taking both Rx outputs (throttle/steering) and converting them into two throttle output values.

To be honest, I've not actually opened up the boat's electronics compartment - I just had a look inside the main shell, and decided to replace the Rx to 2.4Ghz and in turn the ESC to something compatible. For all I know, it's a separate little packaged ESC that does exactly what I want, and doesn't need replacing, then again, it's probably just one board, with all the Rx and ESC electronics. Both motors are wired direct from the electronics compartment, along with the battery supply cable.

Just three screws, and I'll have my answers, but my solution is better than anything that's likely to be in there already (let's just pretend that's the case for now). I'll check tonight, I promise!

So let's just plough ahead full steam anyway.

The Problem: An electronic speed controller that can control twin motors, and based upon steering input, correct/shift the power between the two motors to produce the appropriate turning.

The Solution: Arduino!

I've seen this boat modified with an outboard rudder (with a very nice aluminium structure), and with the motors presumably "Y" linked to the ESC (or two ESC's with a Y-link to the Rx). That's Stage X in my mind, I'm just looking at this early stage (ermm, Stage 1) to put my mark on the boat, without too much hacking or expensive modification (minus the over-the-top solution to follow).

The solution I've decided for at this stage, is to replace both the Rx and ESC with a new Rx (2.4Ghz) and with a pair of brushed ESC (TBC), combined with an Arduino to process the signals from the Rx and to convert into proportional control of the two ESC. The Arduino can then also do other interesting stuff in the future, courtesy of a 3rd channel on the Rx.

Initially, I'll prototype the solution with servos instead of the ESC (they have the same interface, so shouldn't have any problems), as I don't have any spare motors or even any spare ESC at the moment (on order still). The input will be from the Rx, using some custom made cables, and hopefully everything will be powered from a single bus or perhaps two buses to balance the ESC outputs.

I'll start with a single battery powering both ESC, as I don't have much space at the moment for extra batteries (well, whilst this is on the workbench I do but long term I don't). I may have to move to lithium to increase the runtime.

The Arduino will interface using a servo board, with both outputs of the Rx and both inputs of the ESC sitting on the bank of servo I/O - so no wiring or hacking required. The power supply for the Rx and Arduino will come from the ESC's regulated output - as mentioned, still to decide as whether both will come off one, or one each from either.

I've already written a draft script, that just passes the throttle through to the motors. The next draft will introduce a basic proportional control - the R&D comes at this point, where I need to play with three approaches to the proportional mathematics.

In Part 2, I'll show the prototype in more detail (including circuitry), and cover the results of the R&D. Hopefully, in Part 3, I'll be able to show it being installed in the boat, and some tests of it in the water. Between now and then, I also hope to do a post on the boat, and it's strip down, and perhaps a wet test in it's current state.